Category: Uncategorized

  • The Final Stretch

    The final stretch of the school year is here, and it’s both exciting and a bit nerve-wracking. It has been a mix of emotions—excitement, anticipation, and stress. But after months of hard work, assignments, and projects, the end is finally in sight. As a Media Design Student, it’s especially intense because the final projects for our Portfolio Show are due. This Portfolio SHow is extra nerve-racking because they’re a chance to show off everything you’ve learned to actually industry professionals. There is pressure to finish strong.


    But it’s also a time to reflect on how far I have come and how much I have learned. The final stretch is more than just a race to the finish line; it’s a moment to wrap up the lessons, experiences, and growth we’ve had throughout the year. With the finish line approaching, it’s easy to feel overwhelmed, but it’s also an opportunity to push through and finish strong. The key to making it through this busy period is staying organized and focused. Prioritizing tasks, breaking them into manageable steps, and avoiding procrastination. It’s also important to take breaks when needed. Giving yourself time to recharge helps maintain the energy and focus needed to tackle everything that’s left.

    I have learned so much on this journey that I hope to continue and hone these skills in the job, or jobs, I am going to get out of all this hard work. I want to be able to use my skills and be able to succeed. I am also so thankful to all the people that I have met. I love and appreciate all of them, I am so glad that I was able to get out of my little bubble in Huron, SD, and explore.


    As the school year winds down, it’s also a time for celebration. All the late nights, hard work, and dedication are about to pay off, and that’s something worth recognizing. There’s a sense of accomplishment in reaching the final stretch. So, let’s embrace the excitement, stay focused, and finish the school year strong. The end is near, and the opportunities that lie ahead are worth the hard work we’ve put in so far.

  • Laser Engraving

    In one of our classrooms, we have a laser. This is used to both cutout things and engrave our designs. Along with printing and producing our magazines, this is probably one of the most fun, engaging, and physical hands-on things we have done. Software is one thing, but there is just something about seeing a finished product all printed and laid out that is rewarding. This blog will primarily outline the steps for engraving or cutting out your work. The process would be very similar, but there are a couple of things to look out for and change between the two, and even from one engraving project to another, or vice versa.


    This stroke is what .001, it is very small. Once in the laser you only want this layer to be shown to be able to cut the design out of the paper, or material. See picture on the right and compare.
    This is what the design looks like by it. If you wanted to print and cut it out then you would have to hide the dye-cut layer.

    The first thing you can do with the laser is engrave. The first thing we had to do was design something to engrave. In this process you not only have to worry about your design but also the material you are using. This is because the material you use will have different, if not similar, settings for speed, power, and frequency. These are used so that you can see your design at its best. However, be careful not to accidentally cut through your design. After you know your design and the numbers, you will select raster so that it will engrave and not cut. But you can do both; that is a little different.

    Another use for the laser is cutting. The cutting process is similar to engraving, as it requires knowledge of speed, power, and frequency, but with one key difference: you need to select vector instead of raster in the preferences. Vector is the option to cut instead of engraving. Additionally, to cut effectively, you should set your cut stroke width to 0.001. This is why your strokes should not be this small when using raster or engraving.


    Overall, you must always be wary of what and how you want to use the laser. Since the options for each material will likely vary, it’s essential to know what and how to do it correctly to avoid wasting any material. Nonetheless, it was lots of fun to learn this new skill. Even though we only had a few assignments, we were still able to experience it for ourselves. And I would 100% say that this was enough to be able to get a taste of it, without longing for more.

  • What I have learned (Design Class)

    I have learned a lot over these years, especially in design class. Every semester for the past two years we have always taken design classes. In this blog, I want to focus on a recap of all we have learned in our design class. I think it is good to learn new things but also important to think back to everything you already know and hone those skills. The more you practice the better you get.


    This is the isometric illustration.
    This is part of the seven-ad campaign.

    In my first year, first semester, we just focused on the book and learned step-by-step how to do one thing. For example, we would have a chapter on typography and so the assignment for it would be to make a type-based poster. While there were still other things we included in our poster, it was mainly if not fully graded on the typography and how effective it was. Some other projects we did were silhouettes and a zoo map. We also did things like create an isometric illustration, which is a house made in our software using actions to scale, rotate, and share shapes.

    In my first year, the second semester, we started taking two design classes. These classes were Design Fundamentals II and Layout I. In design fundamentals, we made a T-shirt design, did a business rebrand, a business card and vehicle wrap, a trifold brochure, which was related to my business rebrand, and 2 ads both also related to the rebrand. This semester we finally started to get into full-out designs that were graded as a whole. I enjoyed this semester and learned a lot from it. In my first layout class, we did lots of spreads, magazines, and newspapers. But mainly just single pages. We also made a seven-ad campaign and an interactive portfolio of the work we have done so far.

    This is the package design all marked up with bleeds, dye-cut, and labels. (ect.)
    This is the trifold brochure, it is related to the business rebrand.
    This is the business rebrand I did, in the interactive portfolio.

    In my second year, the first semester just last semester, we also had two design classes, Design Development and Layout II. These two classes were used to produce things for the magazine we are currently making now. In the design development class, we made two full-page ads and made a magazine nameplate that would become our magazine cover. We also made a package design and a product label. I especially like making the package design and the product label. My instructor said that we will eventually print them out and display them with our other things at the Portfolio Show this year.

    This is a 3d of the package design.
    This is my poster from my portfolio campaign.

    Finally, in my second year and my fourth and final semester here I took my last two design classes, Layout III and Portfolio Design. I am in the process of taking them now, but these classes have also sort of been conjoined. In my layout class, we are mainly working on a 10-related piece project. Similar to the seven-ad campaign but in a brand and not just flyers or different sizes but things like merch, signs, identification pieces, etc. In the Portfolio Design class, we mainly work on portfolio things, like the name. This includes the portfolio campaign and personal logo for the Portfolio Show.

    This is the first page of my portfolio student book.

    Overall we have learned and been taught a lot and this is just the design classes. There were also other things we learned like Photoshop, photography, and video making/editing. I love how Southeast Tech has its classes. You don’t necessarily focus on one specific thing, you get to learn lots of skills that will all help in almost any future career in this industry.

  • Portfolio Campaign (Portfolio Show 2025)

    Portfolio Campaign (Portfolio Show 2025)

    For the past weeks, I have been working on my portfolio campaign, in my design classes. We even had a contest for it to be the face of our portfolio for this year. We had already voted and everything and Even though I didn’t win I still was able to learn so much. We even critiqued each other so I got some very valuable critiques from my peers.


    This was my table tent design
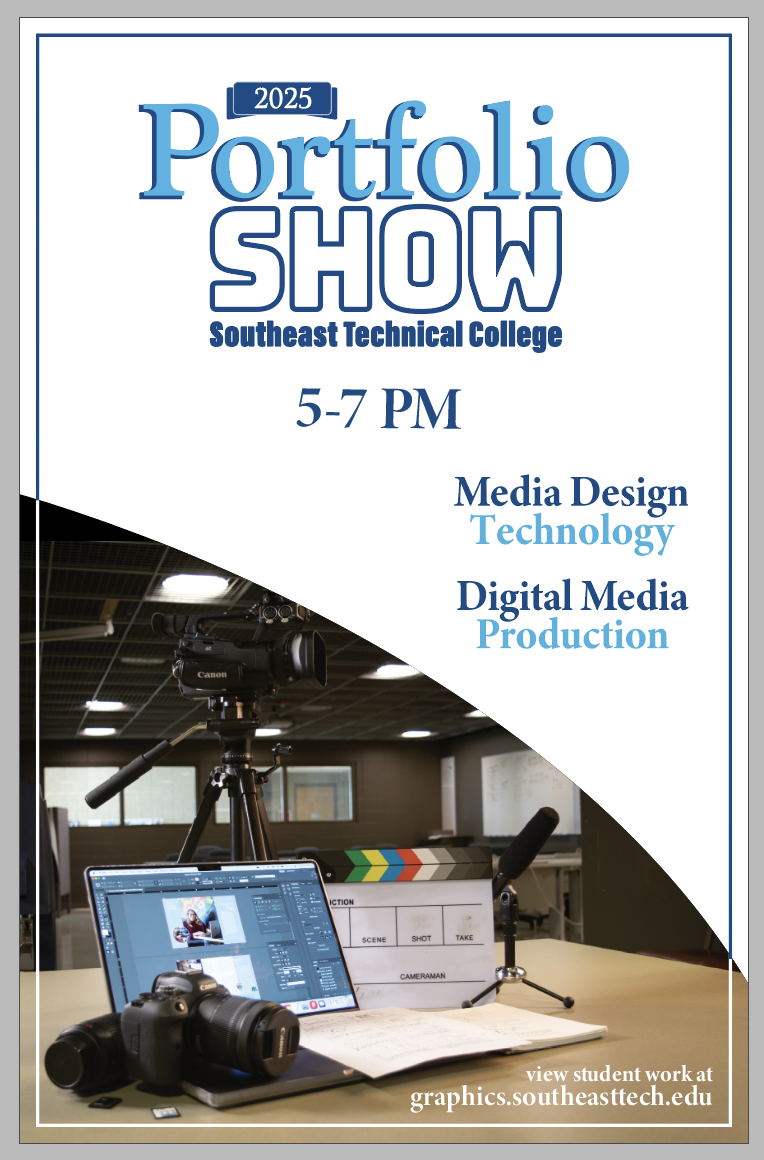
    This was my main poster for the Portfolio Show, this is very similar to my invite.

    In this entire process, we made and mocked up a Poster (11×17), Invite & Envelope (A7 Env size), Guestbook or equivalent, Window Cling, Website Composition, Facebook Timeline Graphic, and a Table Tent. Some things were simple enough because it was just designing things like posters and invites. But the most difficult piece is probably the book mockup. It had the most pages to figure out, even though it was just a mockup, and it didn’t have a definite size that we had to work with. We had the freedom to pick the size and that was both good and bad. It was good because we had that freedom, but it was bad because it had to be a certain paper size. I had a small problem about it being too long for the paper so I had to make it smaller, which made me have to change the inside format as well.

    This is the first page of the student book (program)

    My favorite part of this assignment was probably being able to print out and cut out my work. I enjoyed being able to see it big on paper rather than just on a screen. We worked on a little bit of everything really fun to do. Trying to change the paper size and orientation while also trying to keep the same look, was a very interesting process. But I enjoy doing it a lot.


    Overall the project was both very stressful and rewarding. It also helped me vouch for my time management with printing and cutting. This was probably one of my favorite assinments. It wasn’t just focused on one thing but a bunch of things. I hope that I can continue to learn and grow so that I can get better and better in my skills.

  • Social Media Strategies (engaging your audience)

    In my Multimedia Portfolio class, we have been blogging. Also in my Multimedia Portfolio class, we had to do a presentation on a certain subject. I had the pleasure of doing it on Social Media Strategies, but more specifically how to engage your audience. Fourtualy these relate to each other and I can apply what I learned from it to my blogging. I can learn how to have an effective online presence and how to engage my audience.


    First of all, what is a Social Media Strategy? This strategy is a plan for how to use social media to achieve certain goals. You should use this because it provides a structured approach, helps grow your audience and yourself as a brand, and helps you engage with your audience. Which is what my subject will and was mainly focused on.

    Next, you should know what audience engagement is. This refers to the interaction and involvement of your target audience with your content, brand, or online platform. Your audience can engage with you by reacting, amplifying, and/or responding to your posts. Reacting is things like likes and emojis, Amplifying is doing things like shares and reposts, and responding is things like comments and replies. You should also know that the number of followers you have matters to a certain extent, but how engaged they are is more valuable.

    There are many questions you should ask yourself on this subject. Things like: Why should you try to engage your audience? How to engage your audience? And How do know if it’s working? So first of all why should you try to engage your audience? This is because it enhances your brand’s reputation, helps build trust and loyalty, helps broaden your reach or example, expands on people exposed to your content, gives valuable feedback, and lastly helps you stand out from others.

    Next is How to engage your audience? To do this you need to first Choose the right platforms, then Post consistently and at optimal times, then you need to Create engaging and high-quality content, Visual appeal, Variety, Storytelling, and Actively respond to comments and messages, while also asking questions. You can also use interactive content: polls, surveys, and quizzes to also make a way to engage your audience.

    So How do know if it’s working? To do this you can Monitor your likes, comments, and shares, watch and see if you have steady follower growth, you see you have increased website traffic, you see relevant conversations in your comment section, and you receive positive brand mentions. But there are also some things you should not do. You should not post insensitive or controversial topics that may offend people, Don’t post only what interests you: it’s ok to do this sometimes but you should do both so that you post things that also interest your audience, Overly personal information, Post too frequently, Not respond to comments: even hate/negative comments you can learn from those, or Fail to tailor content to your specific audience on each platform: each platform has a specific way it’s written and audience that is there.


    This subject was very interesting and fun to present. I learned a lot and reviewed and refreshed things that I had forgotten or didn’t think of as much. I think doing these kinds of assinments is very important, to be able to research and review for yourself and share it with others so that they can also learn and review from it. I hope to also write and communicate this to whoever reads this so that they can also learn from it.


    Work Cited

    Ahmed, A. (2024, February 15). Audience engagement: What it is and tips to improve it. Retrieved February 2025, from sproutsocial: https://sproutsocial.com/insights/audience-engagement/

    Dana. (2023, August 10). Retrieved February 2025, from SalesNash: https://salesnash.com/blog/what-is-audience-engagement-examples-and-tips/#:~:text=First%20of%20all%2C%20it’s%20worth,%2C%20brand%2C%20or%20online%20platform.

    Garcia, C. (2021, September 10). Why is audience engagement important? Retrieved February 2025, from Google for Creators: https://creators.google/en-us/content-creation-guides/audience-engagement/why-is-audience-engagement-important/#:~:text=High%20audience%20engagement%20helps%20you,monetization%20opportunities%20in%20the%20future.

    Gordon, R. (2025, January 24). 5 Steps to Engaging Your Audience on Social Media. Retrieved February 2025, from business.com: https://www.business.com/articles/5-steps-to-engage-your-audience-on-social-media/

  • Demonstrate (Printer Spread)

    In this blog, I want to explain how to set up a printer spread from readers spread. This process is pretty easy but it takes longer the more pages you have. However, nonetheless, it should still be remembered how to do it. And to also explain in the process what these are and the importance and difference of both. They each have their use and it is good to know how to set up both of them.


    This is a example of a reader spread
    This is how a printer spread pages would look like (for a couple of pages)

    First, explain what these two spreads are. First of all, a reader’s spread is like in a magazine how you would see the magazine as printed. This is so that you can have an idea of how it will look all together. Next is the reader spread, this kind of spread is used to be able to print your magazine in a way where you can cut and print it. They both have their use so you can’t use one for the other so you got to make sure you use the right one.

    Since making a reader spread is easy and doesn’t take much though it’s the easier of the two. All you have to do is put pages in your document and put the pages next to each other. But the tricky part is the printer spread this is where you have to separate the two pages that are next to each other, this sounds simple but it’s just time-consuming.

    So to do this you need to first separate all of your pages and start on the right side of the first page. Then zig zag your way down until you get to the bottom where you zig zag up. To make sure you did it right when adding the pages, you can always check by adding the two spread’s pages together, and they should equal the number of pages you have in your magazine plus one.

    This is a printer spread, see how the first and last page are next to each other. (see how they make 17)

    Making and printing a magazine was a lot more fun and nerve-racking than I thought it was going to be. It was still very time-consuming and there were still times when I was stressed about it. But I was able to print it and am now in the process of putting it together. As I mentioned printing is fun and there is a lot more work to it than I ever had to do, but it truly is very fun to do. It actually may be one of the most fun and engaging things we have done.

  • How to Print (educate)

    How to Print (educate)

    I have learned a lot here at Southeast Tech. One such thing is how to print. I never thought I would find this interesting. I knew it was an important part but never thought I would do it myself. I love how much we do and is available here. Teaching us the little things has helped me understand this industry and gives me a taste of what there is. I want to discuss all the settings we go through to be able to print things like our magazine or a poster.


    The only ever past experience with a print I have had was back in high school since we always dealt with PDFs until this semester. Whenever I printed before, like back in high school, all you did was make sure everything was on the paper correctly and maybe save paper by making it front and back. But these important settings you need are a check and recheck you always need to be aware of to not affect the printer or have the wrong look or paper. These settings are usually all the same but just a couple of differences, like to be able to accommodate each paper size and kind.

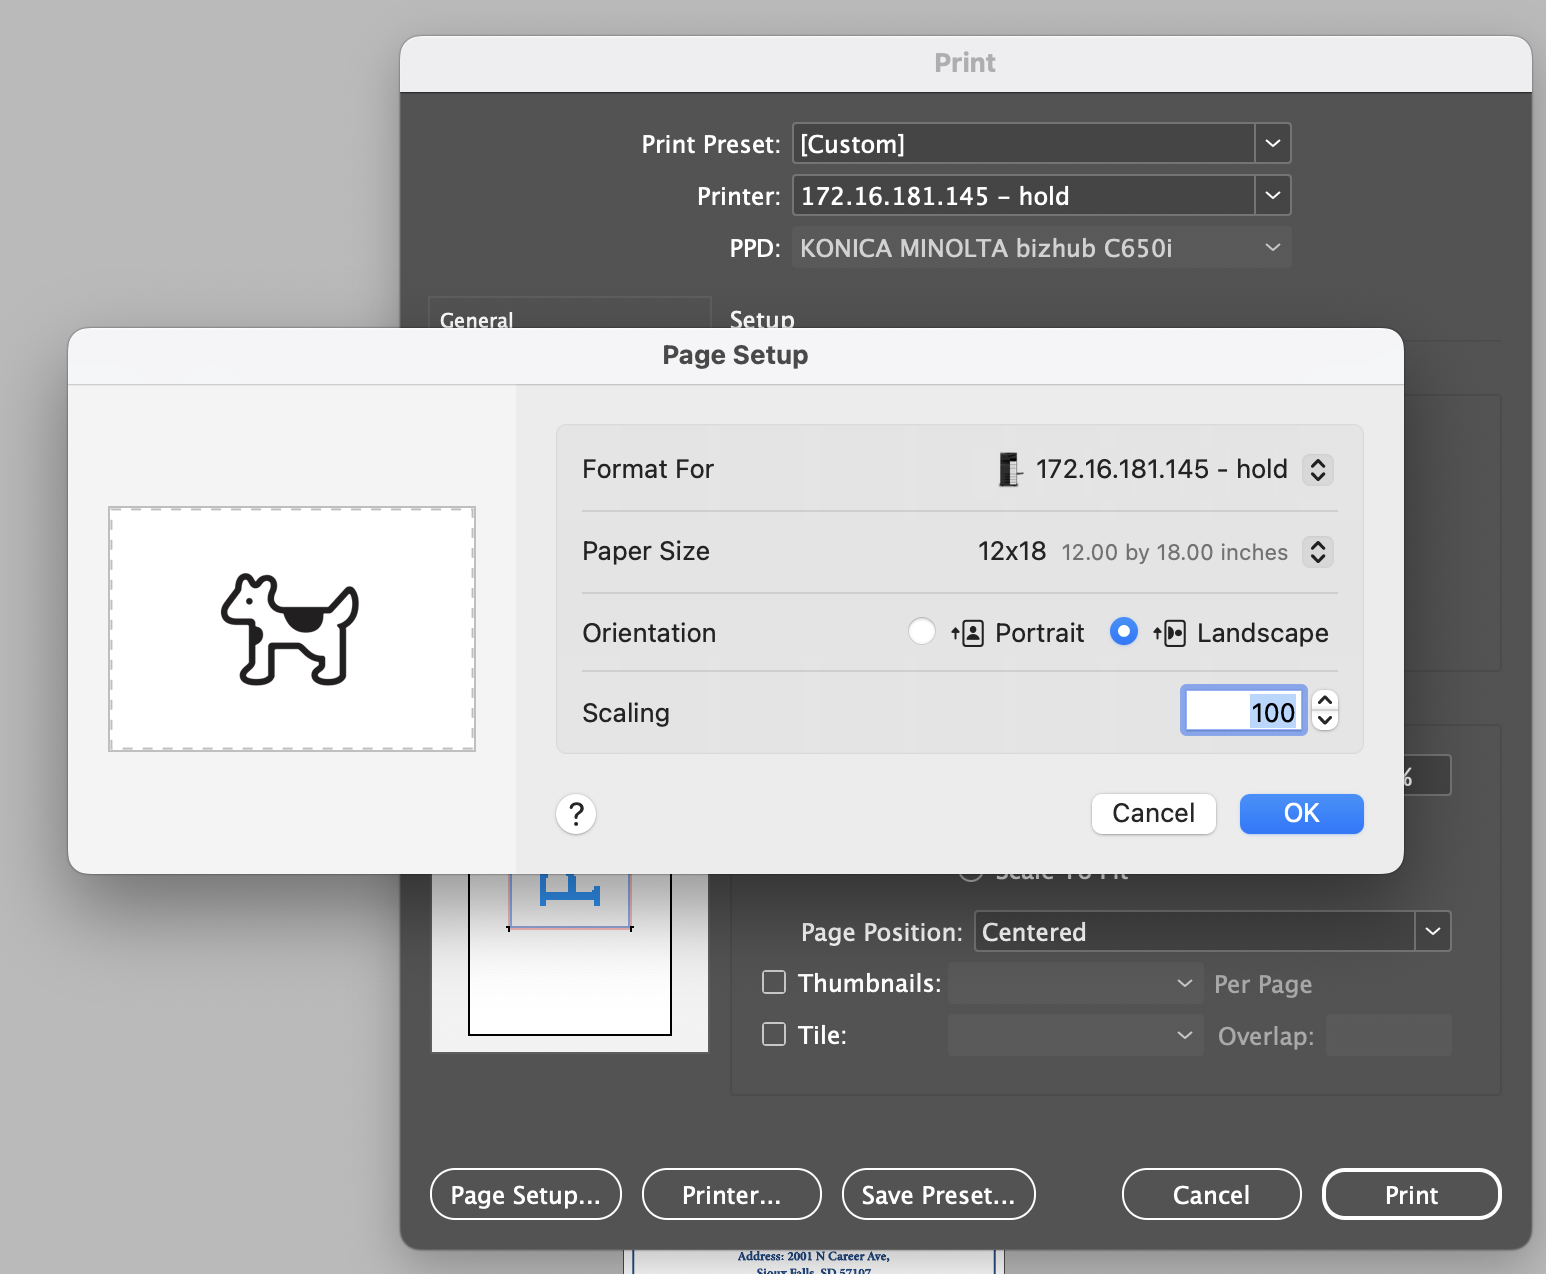
    This is what the page set up options look like (for printing a magazine)

    So, the first thing you need to do, assuming you are in Indesign. Is to go to File > Print. Then make sure that you are connected to the right printer, in this case, it’s a printer starting in 172. In Indesign, you then select setup for the next steps. Also in this first tab, you can select how many or what what pages you want to be printed.

    This is the setting you would see for a magazine

    Then in setup, you need to make sure to select pages if you need pages or spreads if you need spreads. Then you select which orientation is needed, landscape or portrait. Also in this tab, you want to make sure that your paper size is correct, see if you need to scale to fit or scale to width and height, and select the page position to adjust how the content looks and fits on the paper. Then still in Indesign you go to the bottom and select printer. Here you need to make sure the pages are the same as the ones you selected in the first tab, usually, this would just be all pages. You can also make sure that your printer is the same throughout this entire process. Then you can press the blue print button. You can also look at the print setup options and make sure everything is the same as what you had in the first tab.

    This is Fiery (the logo on the app, for visual referance)

    Your final setting and options would be finally in fiery. One printed from InDesign, it is sent here where you can two-click or one-click then press the properties button on the top. Either way, you want to view properties. Here you want to make sure that your paper size is still the same. Then here you can choose the duplex, the paper tray, and the paper type you want.

    So for example settings for printing our 16-page magazine we made would be the following. You first go to File > Print then connect to the 172 printer. Then in setup, select spread and landscape. You also want the paper size to be 12×18 and the scale to fit to be off, so 100% width and height. Then have the page position centered. Make sure that the settings under the printer and page setup options are the same as the rest. Also, make sure to print all pages. Then in Fiery, in properties, you want the 12×18 paper size again, duplex to be top binding, the paper try to be the bypass try, which is the one on the size for specific paper, then have the paper type be thick 1. And lastly remember to always choose print and hold, not just print.


    Me doing this, I was able to figure out that printing is actually really fun. It seems like a simple task but there is a lot more to it, enough that you can get a job in it. I don’t think I could only do this full-time. Nonetheless, it’s still very fun and interesting to do. I love that I was able to learn it and hope to retain this information in the future. And be able to look back here myself if I ever do need a refresher.

  • Computer Case Review

    I use my computer every day and considering it probably is one of the most expensive things I own I knew from the beginning that I wanted to protect it. So I got a nice cheap computer case that had a very good review from Amazon. This blog is a review of this computer case and how well it has worked for me these past two years and some things that I wish were better.


    This is the top of my computer case
    This is the crack mentioned in the paragraph

    This is a very strong and durable computer case. Considering I got it at the beginning of my first year, and even still have it now it’s held up great. It came with a computer screen but I decided not to use that. However, I love the keyboard cover. It keeps my keywords nice and clean and adds a nice grip to the keys.

    However there are some downsides to it, consider that I had it for this long the case has seen better days. There are a few nicks on the front case and I even managed to crack a corner of the case. Granted it did protect it that way it still cracked. Also, the keyboards are wearing down and you can see the keys that I often use. Also, it sometimes leaves residue on the screen when I close my laptop.


    Overall considering the price it is a very good computer case. I would most definitely buy or recommend this to others as a cheap way to protect your computer. But just to replace it maybe every couple of years. I am planning to get a new one soon but will probably be the same brand and type. It works very well and customizes my laptop in the cutest way, so I 10/10 would recommend it.

  • Fundraiser Part 2 (afterwards)

    The fundraiser was everything I could imagine. The music, the sweets, the entertainment—it was all wonderful. We ran into a small problem at the beginning but luckily I knew exactly what to do. I also love being able to help out and support the fundraiser in my way. This blog is part two of the other fundraiser blog that talks about my thoughts up until I went home for the fundraiser.


    I arrived around noon to start and set up the lights during a different rehearsal every hour or so. There was a technical problem with one of the monitors. It just wouldn’t turn on. But luckily I know how to fix the problem. I just had to do a manual restart but pressing a small bullon on the master board. After that, it all went smoothly, and with each act that came up, I just put whatever light and LED lights that looked good with them. I sometimes would ask people what they were wearing so that I could color-match the LED lights with them.

    Like I said before there are lots of wonderful acts that come to perform. But that would take a lot to mention them all, so I just want to mention my favorite and the most memorable ones. First, a favorite of mine was performed by the woman who called me. She both helped plan it and participated in it. It was one of my favorites because she is a good singer and she sang one of my favorite songs from The Greatest Showman, “Tightrope.” I also enjoyed it because some ballerinas came and danced to her singing it.

    Another one was the SDSU Jazz band. They came and blew the crowd away. They sounded so good and it was very interesting to watch and listen to them play. Especially since it’s a college band, you know it’s going to be good. They played three songs with one being sung by the pianist. This also includes my favorite memory because the drummer actually joined another act to add some beat to theirs that day and only practiced with them a couple of times. It really showed their professionalism.

    But out of all of them, my favorite would have to have been my old classmate and friend from back in high school. She has the most beautiful voice I have ever heard and have always loved hearing her sing. It was a real treat to see her and watch her perform again. She sang the song “Still Hurting” from the movie The Last Five Years, with her mom on the piano. Since then I have been constantly listening to it, it’s a beautiful song and I fit her voice beautifully.


    It was a fantastic experience to help out again. I love being able to help whenever I can and this is totally one of the top. I learned a lot from this experience and hope that they will message me again for this same thing or for anything different that they might need. I also learned that there are many ways to help out if you can’t one way you can always find another way. They kept saying how much they appreciated me and I appreciated that from them.

  • Worldly/Well-Rounded (languages)

    Not very many people know this about me, but I know basic Spanish. I don’t want to say that I am entirely bilingual, but I am pretty well-rounded in the language. I was able to take Spanish 1 and 2 back in high school and enjoyed both classes very much. I do like to practice once in a while to keep up with my knowledge and to keep my Spanish sharp.


    I know the basics pretty well, I know how to introduce myself and how to ask basic questions, like where something is. I also know rooms in a house and things inside one, colors, different foods, and even body parts. Body parts are probably my strongest point in Spanish communication. I always say that if I was ever injured in a Spanish-speaking country, I would be 100% fine. My pronunciation is not perfect, so I would also say that I am more confident in writing and reading Spanish than in speaking it.

    One funny experience that I had learning a new language is that I found myself speaking Spanish randomly throughout the day, even now, I sometimes use Spanish words instead of English words. Also, back in high school, I found myself switching back and forth from English to Spanish when I was writing in my non-Spanish classes without even noticing.


    During my two Spanish classes, I was able to learn so much about different Spanish-speaking countries. I have always loved learning about new things and even learning more things about topics that I find interesting. So overall, I recommend taking up another language. I have even started learning some basic French and Japanese words. I think that learning a different language is a very fun and rewarding thing to do. It helps you communicate with others that do not speak your language. And even learning the most basic words can maybe help you later in a dire situation.